Thursday, September 22, 2016

Sewing for Kindergarten


It's hard to believe that it was just three years ago that I was Sewing for Kindergarten with Drew. Now here I am sewing for my second child in kindergarten with the lovely Mie from Sewing Like Mad. Every year she invites fellow bloggers to sew for their new kindergarteners. It's just the push I need to actually sew for my boy and to actually write on this rusty blog!

Nash. Nash.

Oh Nash.

If I could have one hundred Nash's in my life, I would.

And somehow in spite of it he went and turned five and left me for kindergarten. This to this in a blink of an eye:


But kindergarten is FUN. Serious fun. He loves it and is blowing me away with how much he is  learning. However hard it is to watch your child grow older, it is just as much fun to see them learn and become the person they are becoming.


Now I don't sew clothes often for my boy. I think it's because I prefer basics for him and it is easier to pay $12 for a pair of jeans at Target or H&M than to make them myself. And he has a million t-shirts so I didn't want to make him any more of those. But these button down shirts were exactly what a studious little kindergartener needed. I used the Sketchbook Shirt pattern from Oliver + S and whipped out four of them. This red check shirt is my favorite. (You can see the rest at the bottom of the post.)


Now things never get too cold here in the desert but there are days in the winter that you need something more than a shirt. Usually just a hoodie is fine. (Winter is glorious here!) I made Nash a Study Hall Jacket using some textured suiting I've had in my closet forever and some flannel. He loves this jacket. So much that he has tried to wear it several times even though temps are in the 100's still.


He really appreciated his name sewn on the tag.


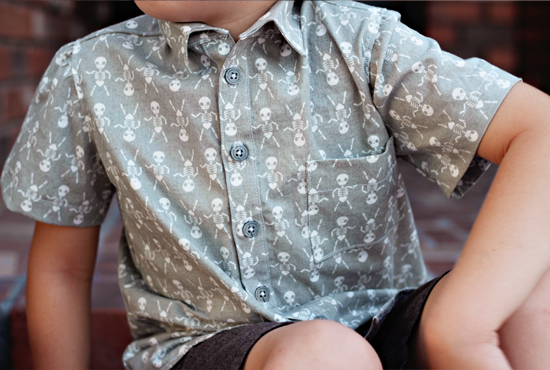
And here is another of the Sketchbook Shirts I made him using Cotton and Steel's skeleton print. And it's not for Halloween. We just like skeletons in our house.


And here are all four of the Sketchbook Shirts I made him:


I did not photograph him in the Super Mario Bros or Minion shirts, although those are of course his favorites. If you see in the pic, those two shirts are shorter than the other two. I found that the Sketchbook Shirt pattern was extremely short in the size 6. They look unproportionate. I didn't have enough fabric to recut those two shirts but I did for the others and I added an extra two inches to the length. Much better. Just something to be aware of if making that pattern.

I hope you have been following along on this fun series! There is nothing cuter than kindergartners and mommy made clothes! Thanks for hosting Mie!


Monday, March 21, 2016

Naples Dress and Tunic Pattern by Jennuine Design


After sewing for this girl for eight years now I've gotten used to her being pretty ho-hum about what I make her. There is usually something that she complains about or I have to convince her how amazing it is. I've actually started sewing less for her and more for my two-year-old because the two-year-old in this instance doesn't cause me as much grief.

So I was pretty shocked when she tried on this Naples Tunic I made and was in love with it. She actually asked me if I could wash it that night so she could wear it again the next day. I guess the loose and flowy feel of it agrees with her princess skin :). The pattern is by Jennuine Design and let me tell you, her patterns are impeccable. There are quite a few options for the neckline, sleeves, as well as dress or tunic length. For my tunic I made the butterfly sleeves and adjusted the bottom for a hi-low hem. I made it with this Anna Maria Horner challis fabric that gives it a beautiful drape.

Scroll down for more pics and to see who else is on the Naples Dress Tour! Also scroll down for a discount code and an awesome giveaway!


You can use code NAPLESTOUR for 25% off any Jennuine Design patterns now through Sunday 3/27.

Also, enter the giveaway for fabric and patterns! Art Gallery Fabrics is giving away a fat quarter bundle of their new Essentials II line and you will also get your choice of any three patterns from Jennuine Design! Enter below:

a Rafflecopter giveaway


Thursday, February 4, 2016

Make the Crayons


Two of our family's favorite books of all time are The Day the Crayons Quit and The Day the Crayons Came Home by Drew Daywalt and Oliver Jeffers. These are books that are just as fun to read aloud (imagine lots of character voices) as they are to listen to. In fact, my kids still laugh out loud at their favorite parts and we've read the books hundreds of times.

Since I don't sew very much for Nash, I had an idea to make him Red Crayon, his most favorite color. From there things got a little out of hand in the solid fabric aisle as I grabbed every color I could think of. (I'm still looking for a neon red solid somewhere because Neon Red Crayon can not be missing from our collection.)


Here is the crew so far. I say "so far" because my kids have requested more colors and I have a crayon sewing problem.


Red is the original, while orange still has attitude about being the color of the sun.


Glow in the Dark Crayon actually glows in the dark! Seriously! I bought some green glow in the dark fabric paint and painted his whole wrapper with it. He's a little stiffer than the other guys but he is pretty fun to sleep with at night! And Esteban the Magnificent is a favorite for any super-hero-loving boy like mine.


Um, please don't look. Peach crayon lost his wrapper and is super embarrassed. How would you like to be on the internet naked?!?


And little stubby blue can't even see over the railing of the crayon box any more.


Do you want to make some of your own crayons?

Crayons Pattern and Tutorial

1. First open the template file  below to get the pattern pieces.

2. Cut out your fabric pieces according to the template. You will use the main color of the crayon for all the pieces except the lighter wrapper color for the two long rectangle pieces. Shorten the wrapper rectangle pieces if you'd like to get a stubby crayon like Blue Crayon.

3. Next you will sew together the front and back of your crayon like in the diagram below. Use a 1/2 inch seam allowance. When you sew the curved crayon top piece to the next rectangle piece, it helps to sew slowly and align your pieces as you go.
4. Press open the seams. Now is a good time to paint on the face and triangle border. I used a black soft fabric paint for this. I also used fabric markers to write the names of the crayons on the wrappers. Read the directions of your paint, but you usually need to apply some heat to set in the design after it dries.

5. Now is a good time to get the most painful part of the project out of the way. The arms and legs are so skinny and cute, but they sure are a pain to turn and stuff. Put two arm pieces together and sew around three sides leaving the tiny opening. Turn the arm right side out using a skinny dowel then stuff with stuffing also using the dowel. Repeat with the other arm and legs. When finished with this step your pieces should look like the diagram below. (Except paint the triangle border on the back piece as well.)
6. Next, sew the arms and legs to the front of your crayon.
7. Now you will sew your front to the back by putting the right sides together and keeping those arms and legs out of the way of your stitches and stuffed inside. Sew along the sides and top of the crayon, leaving the bottom open.
8. Now you will sew your bottom circle about halfway around the bottom opening of your crayon. Make sure you attach it to the front of the crayon where the legs are already sewed on, sewing slowly and aligning the edges around the circle as you go. Leave the opening in the back of the crayon to turn and stuff it.
9. Turn your crayon right side out and stuff it really full. It will probably get used as a weapon like mine do and will need lots of stuffing to keep its shape.

10. Sew the hole closed using a ladder stitch (here is a nice tutorial for a ladder stitch). Since you are attaching it to a circular bottom piece, you will get some gathers in the straight piece as you attach. It makes a cute crayon bottom.

You're Done!!!

Now try to stop yourself from making every darn color in the 64-count crayon box.